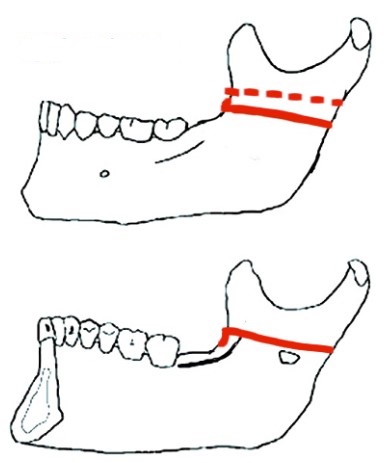
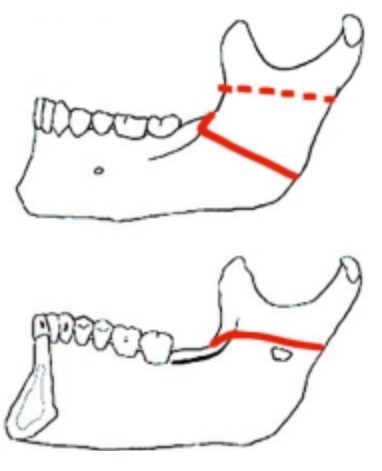
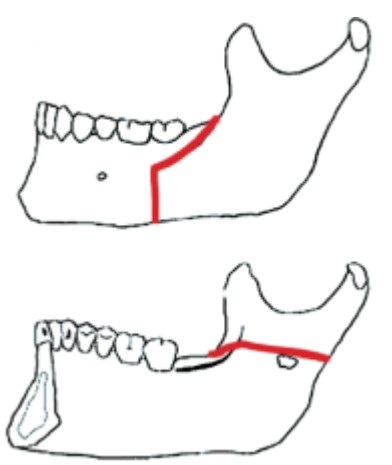
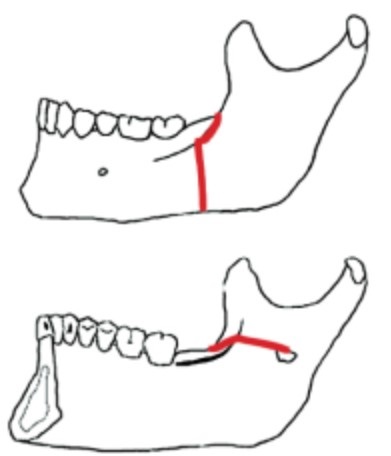
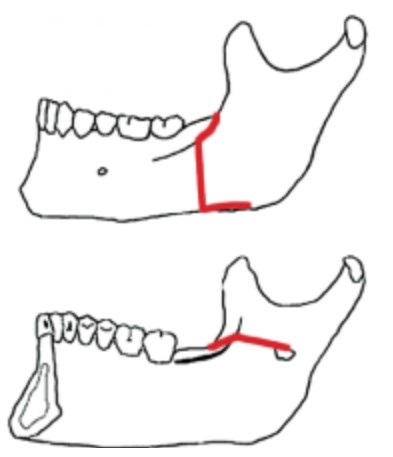
History of Bilateral Sagittal Split Osteotomy
Epker modification: Dissection is carried out, only as needed, avoiding excessive stripping of the masseter and medial pterygoid muscles. This causes less swelling and postoperative discomfort as well as preservation of blood supply.
Posnik Modification Article: Use of a Low and Short Medial Cut Limits Sagittal Ramus Osteotomy Interferences
Armamentarium
- #15 Scalpel blade
- Appropriate sutures (4-0 vycril and 4-0 chromic gut sutures)
- Bite block
- Burs (diamond bur for occlusal reductions, pineapple or round carbide bur for reduction of interferences)
- Chisels (thin spatula and large ones)
- Electrocautery
- Frasier suction tip
- Freer elevator
- Gauze director (“pickle fork”)
- Hargis retractor
- J-stripper or channel retractor
- Kocher’s forceps (Kocher with chain and regular Kocher)
- Mallet
- Metzenbaum’s scissors
- Minnesota retractor
- Needle holder
- Periosteal elevators
- Reciprocating saw (22.5mm)
- Selden retractor
- Smith spreader x2
- Toe in and toe out retractors
- V notch retractor
- Wire cutter
- Wires (24 and 26 gauge wires)
Procedure Demonstration
- If a patient with a “V” shaped mandible undergoes set-back BSSO, a gap is created posteriorly between the cortical plates of the proximal and distal segments. If lag screws are used for rigid fixation, the gap is closed and there is narrowing of the intercondylar width.
- As the distal segment is advanced, there is often the creation of a gap at the anterior-superior extent of the osteotomy site. If the segments are compressed together at the time of rigid fixation placement, there is a fulcrum based on the distal segment and lateral displacement of the condyle. Several techniques have been described in order to avoid unfavorable condylar displacement. These include the use of bicortical position screws, placement of bone shim between the proximal and distal segments, recontouring of the proximal/lingual aspect of the distal segment, and addition of a midline/symphyseal osteotomy.
- Loss of fixation on one side of a bilateral sagittal split osteotomy typically causes a contralateral open bite, deviation of the mandible towards the side of the hardware failure,and lower facial asymmetry. The open bite occurs typically occurs as ramus height is lost and an early occlusal contact occurs.
- The position of the inferior alveolar neurovascular bundle is an important determinant in the design of the sagittal split osteotomy. The neurovascular bundle travels just under the facial cortical plate of the mandible. Whether the osteotomy is made with rotary instruments or a reciprocating saw, the vertical cut must be carried just through the cortical plate (i.e. monocortical). The thickness of the bone over the neurovascular bundle is greatest in the area of the second molar. The vertical osteotomy should be placed lateral to the second molar unless circumstances dictate otherwise.
- Rajchel J., Ellis E., and Fonseca R.J. The anatomical location of the mandibular canal: its relationship to the sagittal ramus osteotomy. Int J Adult Orthod Orthogn Surg 1:37-47, 1986.
Pediatric BSSO
- The inferior alveolar artery and vein are located posteriorly and laterally relative to the inferior alveolar nerve.
- The lingula and inferior alveolar foramina are located in a more superior and posterior position in this age group. This has technical implications in determining the vertical placement of the medial osteotomy of the ramus. If the medial bone cut is positioned high on the ramus, then injury to the nerve is avoided, but the risk of unfavorable split (i.e. buccal plate fracture) increases. In children, the sagittal component of the osteotomy design should be placed as far laterally as possible in order to avoid injury to the developing teeth. Children will have a higher propensity for “greenstick” fracture along the inferior border of the mandible. Their bone is more cancellous in nature and this often results in a longer area of fracture along the inferior border of the mandible. Developing third molars can be removed after the mandibular ramus has been split. In cases where the third molar teeth are only partially developed, they can still be enucleated while the proximal and distal segments are separated
•3rd molar incision (monac if WT are being extracted), anterior vestibular up until mental nerve area, posterior vertical incision up ramus
•Buccal pocket, toe out, strip minimally buccal, up ascending ramus and temporalis, mediallly
•Hargis (V-notch) to strip ramus
•Crocker with chain at coronoid, kept in place with 2nd crocker
•dissect medial ramus, J stripper at inferior border
•tease out lingula w/ obwegaser (must see bone all around it)
•toe out retractor at inferior border
•recip saw — medial cut above lingula towards lateral and down ramus, then anteriorly (5 mm from lateral cortex) up until 1st/2nd molars
•keep saw angled towards teeth
•Make sure buccal and inferior border dissection complete
•cut along inferior border with inferior border saw
•go over entire cut with sonopet
•bite block goes in
•3 chisels w/in osteotomy
•wooden spatula x2
•smith spreader x2 —> crack it
•IMF —> dog bone plates x2
⁃mucosa first on incision
⁃carry it to about the 2nd molar
⁃go back through it with the bovie and get to bone
⁃develop a pocket with the sharp end of the periosteal, then use the flat end to make the pocket bigger
⁃use the sharp end to start the medial dissection, must stay on bone and develop a pokcet; use the flat end once you’re able to and strip up and down, anterior and forward
⁃as you keep the periosteal in the pocket, use the freer to dissect to bone all around the lingula. the lingual pocket should be big enough to retract with a seldon
⁃you must see all the bone around the lingula!!!
⁃when you use the recip saw, then place it at a 45 angle for the medial cut, hold the handle of the saw further up the blade so that it doesn’t obstruct your view; you want to be able to score it down. You must sink your blade tip to depth
⁃As you make the first depth cut, then start pulling out the blade
⁃as you start doing the sagittal cut, start flattening the blade, meaning start dropping the handle down and you can hold the blade closer to the tip for more control
⁃You may start skipping if there is a tooth in the way
⁃Try your best to stay within your cut
⁃The goal of depth is just through marrow
⁃When you do your lateral buccal cut, it’s important to do the inferior border well
⁃use a tow out and “tent” the dissection you made and protect your flap as you cut the inferior border
⁃your J stripper must be good; your V notch/hargis must be good to retract all the muscle tissue
⁃use the sonopet and be sure that inferior border cut is good, go all the way through both cortices.
⁃use the sonopet to go through the marrow, you should see some bleeding bone when you’re in the marrow space
⁃When using the sonopet, use your resting hand as a fulcrum so you dont skip
⁃chisels tap tap; soft tap is 1 tap. then use woodens. then use smith spreaders. dont take anything out unless you’re maintaining the space with another instrument
⁃when you are pushing the plate against the bone with a needle driver, then push it at the inferior 6 o clock position or 12 o clock position of that hole.
⁃when using embrasure wires 19gauge, then rock it back and forth once you’re in between the premolars
⁃use vicryl to approximate the transition point of your dissection, then running chromic gut
⁃flowseal is good
⁃Tooth came on the proximal segment (more buccal) when you took out teeth
⁃If you have to fish for a root, put the periosteal in a buccal trough pocket and move the handle of the periosteal towards the nose
⁃Remove all the bony spicules with a rongeur when you have the mandible split/tooth removed
For BSSO, if WT – use Monach, meaning you go around the sulcus, then drop down from the papilla nad then go forward
If not doing WT, then just go lateral to the ramus, through mucosa carry it forward to in front of the first molar, then go to bone within 3 strokes
Then use the periosteal to make a pocket, sharp end first, then fat tend, go down, then toe in
Use bovine to continue up lateral side, then medial side, you don’t have to strop posteriorly if doing bsso. If doing ivro, you have to go back for the lavasseur
Dissed with periosteal medically, may have to get the temporalis off the medial side.
Hargis goes in, strip up
Then use Cocher and cocker on a chain to tent the tissue superiorly, cocker attaches to the head wrap
Okay so now you have to dissed to see the “nipple” use the periosteal to dissect a little inferior and identify the lingula. Use the freer to go around if you need to
Once the pocket is made, with the periosteal. Then you use the Sheldon to swap the periosteal out, should be all the way back on bone
Recip saw goes in at 45 degrees. If it is a thin mandible, may have to change orientation to be more vertical.
Mark it
Then go in, tip goes in so that you’re past the lingula, then start pulling out as you go down towards the sagittal cut
Be sure you’re not going too lateral
It may be easier to hold the saw higher up so you can see, use a second hand to balance and rest if you need to
Carry it forward and buccal, go straight.
Strip the inferior border with periosteal broad,then J hook, carry it forward. Then do your vertical cut. Use a tow out retractor to tent out the tissue for yourself. Once the vertical and sagittal cut is made, hopefully you can connect it with your recip saw. Otherwise use your sonopet
Angle the sonopet so you’re away from teeth. The vertical cut should also be at an angle so the buccal plate is cut at like a 45 degree angle. Go through all the he marrow 0- should be able to see bleeding bone. If there is a WT, you many be bouncing off the tooth. For inferior border, you want to go as horizontal as you can. use the tow out to protect the tissue.
So now your cuts are done
Use the straight chisels at the top, middle, and at the corner where the vertical is. Be sure to do the vertical cut at an angle, you you may have to twist/rotate it out as you use a medium wooden to twist.
Use the smith spreaders tapped in, first at the bottom, then more so at the medial/top cut, gradually flare things out, stay above the nerve.
Put patient in IMF with the fishloops
If doing a subabpical , may need to wire in the lingual splint
when plating, use the cocher to kick up the proximal segment, first hole is “imagined” on the dog bone plate. Just drill it in. First hole is no locking bone screw. The other 2 are locking. Usually 4-5mm
When plating it, you may need to use a toe out the protect the tissue and press on the plate. Use a needle driver if you need to to flex the plate down.
Smooth in and out with the drill, try to be 90 degrees
If doing a setbac and there’s a lot of posterior interferences, you may have to break the lingual plate
The lavessuer has to “click” in the back and you should do your oscillating cuts with it under tension
Be sure you aim for the Breuer protecting the sigmoid, dont go towards the condole. The safety distance is built into the lavessur
Once you do the superior cut, switch to the other beaver to do the bottom cut.
The bottom may need to be stripped more with the J hook. As you go down, the bone is thicker, so you will be going deeper with the oscillating saw.


